I always think of cold afternoons and a stash of colorful papers when Valentine’s Day rolls around. Pulling out scraps, ribbon, and a stubborn glue stick feels like making little, tangible notes of warmth.
Those quiet moments with paper and color have become my way of saying something sincere without words.
Valentine’s Day paper crafts have a humble charm that surprises me each year. There’s a comfort in folding hearts, hearing the soft rustle of cardstock, and seeing a mantel slowly fill with tiny handmade tokens that carry memory and texture.
Delicate heart garland with layered papers

I remember hanging a heart garland across my living room window and watching afternoon light make each layer glow differently. Thin vellum sat over heavier cardstock, creating a soft halo where colors overlapped.
The edges had that crisp whisper when fingers brushed them, and the whole line swayed with a faint papery rustle. Little shadows played along the wall, turning a plain room into something quietly festive.
The garland felt personal, like a string of tiny notes, and guests often paused to trace the patterns with a curious smile.
Steps
- Gather different weights of paper and trace a heart template onto each sheet.
- Cut out multiple hearts of varying sizes and stack lighter sheets over heavier ones for contrast.
- Punch small holes near the top of each layered heart and thread them onto a length of twine, spacing them evenly.
- Add tiny knots or beads between hearts to hold placement and create gentle spacing.
- Hang the garland from hooks or tape across a window or mantel, allowing it to catch light.
A cozy pop-up card with hidden heart bloom

Making a pop-up card felt like catching a secret inside a folded paper world. When the card opened, a layered heart blossom rose up with a small flurry of shadows and depth.
The paper edges cast tiny lines across the interior, and the inner colors surprised me more than the outside cover. Holding it close, the smell of fresh cardstock mixed with a faint adhesive tang felt oddly nostalgic.
That little three-dimensional moment carried more warmth than a flat note, and it always drew an amused, delighted look from whoever opened it.
Steps
- Score and fold a sturdy card base, leaving a wide interior space for the pop-up mechanism.
- Create a layered heart shape on lightweight paper, attaching small tabs at the bottom to form a hinge.
- Insert the hinged heart into the card interior so it folds flat and pops when opened.
- Add decorative details around the pop-up like hand-drawn lines, small cutouts, or contrasting paper backgrounds.
- Test the opening motion and adjust tab placement for a smooth pop and stable position.
Paper roses that sit in a tiny bouquet

I spent an evening crafting paper roses and ended up with a small bouquet that looked almost fragile enough to blow away. The petals had a slight curl and a velvety appearance when folded just right, catching light along their tapered rims.
Mixing pastel pinks with deeper reds brought depth, and the scent of warm tea from my mug blended with the faint smell of glue in the room. Arranged in a tiny recycled jar, the bouquet made the kitchen table feel curated and oddly indulgent.
Steps
- Trace petal templates onto crepe or thin cardstock and cut out layered petal shapes.
- Gently shape petals by stretching crepe or curling cardstock edges to create a natural curve.
- Assemble petals around a central bud using a small strip as a base, securing each layer as it builds outward.
- Attach a paper-covered stem or floral wire and add subtle leaf shapes for contrast.
- Group several roses in a small vase for a compact, hand-crafted bouquet.
Tiny love notes folded into secret envelopes

There was a thrill in slipping a tiny handwritten note into a miniature envelope and tucking it where it might be found. The envelopes were made from patterned scrap paper, each crease making a satisfying, soft snap.
A quick sniff of ink and paper brought back school-day memories for me, and the flaps had a pleasant papery friction when sealed. Leaving one on a mug handle or inside a pocket felt like a quiet, playful ritual that turned ordinary moments into small, private celebrations.
Steps
- Trace a small envelope template onto patterned paper and score fold lines for clean creases.
- Fold along the scored lines to form the envelope shape and tuck a tiny note inside.
- Secure flaps with a dab of adhesive or a decorative sticker and press gently to seal.
- Add a small wax seal impression or paper heart tab for extra charm.
- Place envelopes in books, pockets, or mugs as surprise tokens for loved ones.
Lace paper doily candle lanterns for evening glow

Paper doily lanterns cast a delicate pattern when a candlelight flickers inside, and I recall the first evening I draped a string of them along a balcony. The cutouts threw lace-like shadows across nearby surfaces, and the soft light warmed the whole corner.
Thin doilies felt almost featherlight in hand, their perforations crisp and rhythmic. Even the faint scent from the candle softened the paper into a gentle, warm ambiance.
The lanterns turned a chilly night into something quietly romantic without fuss.
Steps
- Select sturdy paper doilies and gently wrap each one around a small glass votive, trimming excess as needed.
- Fasten the edges with a small adhesive strip or decorative tape to hold the doily in a cylindrical shape.
- Place a battery-operated tea light inside each glass to create safe, flickering illumination.
- Arrange lanterns along a tabletop, windowsill, or balcony rail to produce patterned shadows.
- Add ribbon or twine around the glass rim for a finished, decorative touch.
Confetti heart poppers for playful surprises

I loved handing out little confetti heart poppers at a small gathering, watching faces light up as paper bits fluttered down. The confetti had a tactile crispness and a muted rustle when shaken, like tiny celebratory rain.
Color combinations ranged from blush and cream to bold red and gold, each palette giving a different mood to the moment. The aftermath strewn across tabletops felt festive rather than messy, and sweeping up the small papers turned into a laugh-filled communal task that extended the celebration.
Steps
- Fill small paper tubes or folded paper pockets with lightweight heart-shaped confetti.
- Seal one end and fold the other into a flap designed to release confetti when pulled.
- Decorate the exterior with patterned paper or stickers for a festive look.
- Hand out to guests or place poppers on plates for a surprising moment during a gathering.
- Encourage a gentle pull action to release the confetti upward for a soft cascade.
Handmade love coupon book with paper pockets

Creating a pocketed coupon book felt like crafting small promises you could hand over with a smile. Each pocket held a tiny folded paper note, and pulling one out made a soft, satisfying rustle.
I mixed brighter paper with muted tones to give each coupon its own personality, and the stitched binding had a gentle, tactile rhythm when thumbs ran along it. That little book lived on my mantel for a while, offering playful vouchers that sparked laughter and a few deliberately indulgent moments between friends and partners.
Steps
- Cut several matching paper rectangles for coupon pages and fold them to create pockets on each page.
- Glue or stitch the pocket edges to a folded cardstock cover, leaving the top open for slips.
- Write personalized coupons on small slips of paper and tuck them into each pocket.
- Add decorative tabs or labels to indicate different themes for each coupon.
- Bind the spine with twine or a simple stitching technique to keep the pages secure.
Origami kissing lips for playful table decor

Folding paper into small kissing lips felt oddly playful and transported me back to sticky-schoolyard crafts. The little lips had crisp cheek lines and a soft, rounded profile that caught light on the curves.
A cluster of them across a dinner table created a whimsical, cheeky mood, and the sound of soft paper folds carried a familiar, domestic intimacy. Colors from glossy paper added a faint sheen, while matte stocks offered a gentler look.
Guests picked them up, amused by their simplicity, and left tiny paper traces on napkins.
Steps
- Start with square paper and follow an origami sequence to form the base lip shape with precise folds.
- Create rounded lobes by tucking and shaping corners to mimic the natural curve of lips.
- Flatten and adjust creases so the lips sit cleanly on a flat surface.
- Repeat with different colors and sizes for variety across a table setting.
- Arrange lips as scattered decor or place one at each setting for a playful touch.
Recycled book page hearts with vintage charm

I once tore pages from a damaged paperback and folded them into small hearts, and the result felt like repurposed memories. The faint print showed through in ghostly letters, adding a layered texture and a hint of narrative to each heart.
The paper edges had a papery musk that mixed with the faint dust of old bindings, and thinner pages took on a delicate translucence when held to light. Arranged in a shallow bowl, they looked like a small archive of affection, imperfect and quietly storied.
Steps
- Tear or cut heart shapes from old book pages, keeping the printed text visible for texture.
- Gently fold or slightly crumple some hearts to introduce variation in shape and shadow.
- Create a small pile or string them into a garland by attaching with thin thread.
- Combine with ribbon or muted fabrics in a shallow bowl or on a mantel for display.
- Consider sealing with a light coat of matte finish for longevity if desired.
Quilled paper hearts with delicate filigree

Paper quilling felt like miniature sculpture, each coil becoming an airy filigree that caught light between its curves. I remember spending an afternoon looping thin strips into spirals and watching them relax into tiny heart motifs with fragile depth.
The edges created little threads of shadow, and the fine paper had a pleasing smoothness under the fingertips. Arranged on a plain card or mounted in a shallow frame, the quilled hearts read as refined and fragile, like tiny architectural sketches of affection that invited a careful, appreciative glance.
Steps
- Cut or prepare narrow paper strips and wrap them around a quilling tool to form tight coils.
- Release coils slightly to shape them into teardrops and join pairs into heart forms.
- Arrange quilled elements into a composition and adhere them onto a backing with fine adhesive dots.
- Add contrasting color strips or tiny beads for accent and depth.
- Frame the finished quilled panel or mount it onto a card for presentation.
Layered heart shadow box with pop of color

A layered shadow box felt like building a tiny, framed world where each paper heart lived at its own depth. I placed softer tones in the back and brighter shards in front, and the layered edges created thin, intriguing shadows that shifted with the light.
The box had a museum-like hush, as if those small paper forms deserved quiet attention. When hung on the wall, the piece collected reflections and small changes in tone throughout the day, offering a compact, contemplative moment each time I passed by.
Steps
- Cut heart shapes in several sizes and colors to create a layered composition.
- Arrange hearts on staggered foam pads or spacers to establish depth within the shadow box.
- Secure each heart to its spacer and position them onto the backing board.
- Place the backing inside the shadow box frame and close to preserve the layered effect.
- Hang the box where natural light can accentuate the shadow play and color contrasts.
Sweet heart-shaped confetti bookmarks
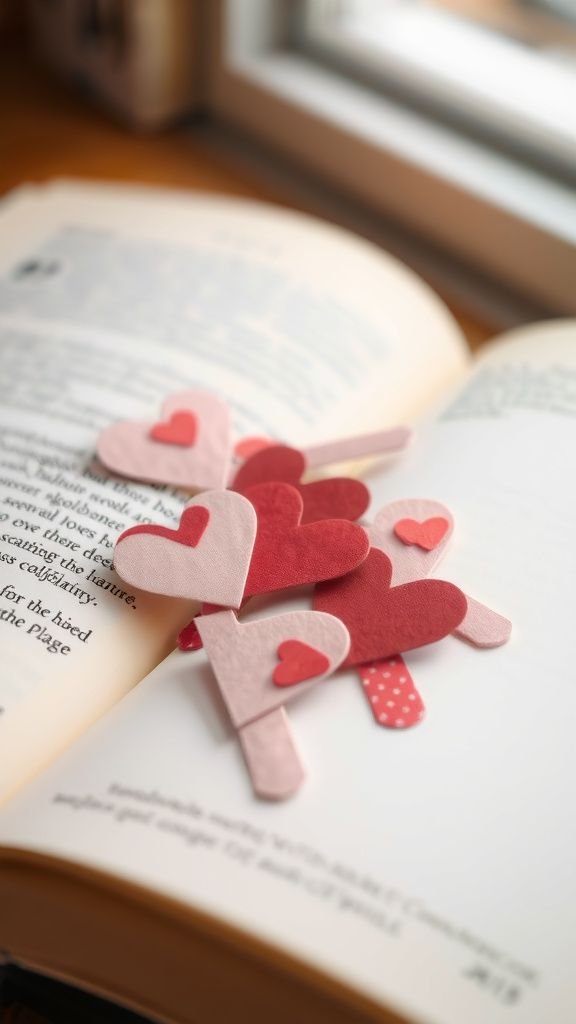
Bookmarks made from heart confetti felt like tiny tokens of attention for a reader’s page. The paper had a pleasing stiffness that slid between pages without catching, and the small heart tab peeked out like a secret signpost.
I liked the gentle resistance when pulling a bookmarked page free, a tactile reminder of where a story paused. Combining patterned head pieces with plain paper tails created a small contrast that pleased my eye, and passing one along with a borrowed book felt like a thoughtful, almost ceremonial gesture.
Steps
- Create heart-shaped tabs from sturdy patterned paper and attach them to narrow cardstock strips.
- Reinforce the base of the heart with a small adhesive patch to prevent tearing.
- Trim the bookmark tails to a comfortable length for most books.
- Optionally add a short tassel or ribbon loop for ease of retrieval.
- Pair the bookmarks with a favorite book as a small, personal gift.
Fringed heart bouquet with paper stems

A bouquet of fringed paper hearts had a playful, tactile energy that brightened a windowsill. Each heart carried a ruffled edge that caught light and made the cluster feel lively and almost feathered.
The stems, wrapped in green paper, provided a satisfying contrast to the ruffled blooms and added a slight weight that kept the bouquet upright. I enjoyed the soft papery shuffle when arranging them and the way the fringes moved with the room’s draft, lending the arrangement a small sense of motion and liveliness.
Steps
- Cut heart shapes and create fringe by slicing narrow strips along the inner edge of each heart.
- Slightly separate and fluff the fringed strips to create a ruffled effect.
- Attach paper-covered stems to the base of each heart using adhesive and allow to set.
- Combine multiple stems into a small vase or jar, adjusting bloom positions for balance.
- Add foliage accents made from green paper for a more organic look.
Miniature heart wreath for a tiny door

A tiny wreath composed of miniature paper hearts sat on a small cabinet door and drew amused glances. Each tiny heart overlapped into a continuous ring, and the compact form had a pleasing symmetry.
The crisp edges and small scale made the piece feel delicate, and the muted palette of blush, cream, and rose gave it a gentle, understated presence. Its size invited a smile rather than a grand declaration, like a wry whisper of affection tucked into an everyday corner of the home.
Steps
- Cut many small heart shapes from assorted papers and arrange them in a circular layout.
- Overlap and adhere each heart slightly to form a continuous wreath shape.
- Trim the outer edges for an even silhouette and reinforce the base with a thin cardboard ring.
- Attach a small loop of ribbon or twine for hanging on a tiny door or cabinet knob.
- Place the wreath in a cozy spot where its small scale becomes an unexpected delight.
Accordion-folded heart fan for table centerpiece

An accordion-folded heart fan opened like a small paper bloom and became a lively centerpiece that caught conversations. The pleated paper created rhythmic shadows that seemed to move with passing hands, and the layered folds offered a tactile ridged feel when run by a fingertip.
Choosing a mix of printed and solid papers added depth, and the fan’s radial symmetry felt satisfying to the eye. Placed on a low plate or stand, it anchored the table without overwhelming things, lending a homemade, thoughtfully arranged character to the setting.
Steps
- Fold a long strip of paper into tight accordion pleats to create a fan effect.
- Shape the pleated strip into a semicircle and join the ends to form a fan.
- Cut a heart silhouette and attach it to the fan base for a defined shape.
- Mount the fan on a small stand or place on a low plate to serve as a centerpiece.
- Combine multiple fans of different sizes for layered table arrangements.
Paper tassel bouquet with soft pastel tones

The paper tassel bouquet felt like a handmade version of pom-pom joy, each tassel with a playful fringe that rustled when lifted. The pastel palette gave the bunch a gentle, airy quality, while stems wrapped in kraft paper added an organic counterpoint.
Touching a tassel produced a soft, papery whisper that reminded me of gift wrap unraveling during holidays. Set in a narrow vase, the bouquet had an exuberant yet restrained presence, like a small festival captured in quiet colors that brightened a shelf without shouting.
Steps
- Create tassels by folding and slicing paper strips, then rolling and securing the top to form the tassel head.
- Attach each tassel to a paper-covered stem or thin dowel for structure.
- Group multiple tassel stems together and wrap the base with kraft paper for a cohesive look.
- Trim stems to the desired length and arrange in a narrow vase.
- Adjust tassel positions for volume and a balanced silhouette.
Heart-shaped paper mobiles that sway gently

A ceiling mobile of suspended paper hearts created a slow, graceful movement above a reading nook and felt like a small meteor shower of affection. The hearts hung at staggered heights, each catching light differently and spinning with a faint whisper.
The thin string and paper edges created a subtle shadow dance on the ceiling, and watching the mobile became a calm ritual after a busy day. The combination of colors and negative space between hearts offered a sense of airy composure, turning empty overhead space into something warm and poetic.
Steps
- Cut heart shapes in multiple sizes and punch small holes at their tops for hanging.
- Thread hearts onto thin fishing line or twine at varying lengths to create depth.
- Attach the strands to a circular hoop or frame to form the mobile structure.
- Balance the hanging points so the mobile rotates evenly in gentle air currents.
- Suspend the mobile securely from the ceiling or a hook above a nook.
Paper fortune cookies with tiny love notes

Folding paper into faux fortune cookies felt like making tiny edible-looking surprises without the crumbs. Each folded shape held a slender strip of paper bearing a small, handwritten sentiment, and sliding it out produced a slight paper whisper.
The curve of the cookie caught light along its edge, giving a soft highlight that made them look almost pastry-like. Arranged in a shallow bowl, they tempted people to reach in, and the mix of textures—smooth paper shells and crisp note slips—made the act of opening one feel like a small, private delight.
Steps
- Cut circular paper discs and fold each into the classic cookie shape, pinching the center to hold form.
- Slip a narrow handwritten note into the fold before fully closing each cookie.
- Secure lightly with a dab of adhesive if needed to maintain shape.
- Place cookies in a small bowl or arrange them on a serving plate.
- Invite guests to pick one and read the tiny message inside for a playful moment.
Button-and-paper heart collage with texture contrast

A collage mixing flat paper hearts with small buttons brought a tactile contrast that felt unexpectedly rich. The glossy buttons caught light and added little jewels of reflection amid matte paper surfaces, and the interplay of shapes created a lively rhythm across the piece.
I liked pressing my thumb gently over a stitched button to feel the slight bump beneath, a quiet reminder of handiwork. Mounted on a thick backing, the collage read like a layered map of small moments, inviting close inspection and occasional, amused tracing of the little elements.
Steps
- Arrange paper hearts of different sizes on a sturdy backing board to establish a pleasing composition.
- Select buttons in complementary colors and attach them near or atop some hearts using strong adhesive or stitching.
- Add small paper accents like tags or tiny folded shapes to introduce additional texture.
- Secure the edges and mount the finished collage in a shallow frame.
- Display the collage on a wall or shelf where its tactile elements invite attention.
Heart-shaped paper lanterns strung outdoors

I once strung heart-shaped paper lanterns across a small patio for an evening gathering, and they transformed the space into a soft-lit nook. The lanterns glowed with a tender warmth when lit, and their shapes cast gentle heart silhouettes across nearby surfaces.
The paper had a faint translucency that diffused light into a cozy wash, and the air carried a distant hum of conversation as the lanterns bobbed slightly. They created an intimate atmosphere where conversations felt closer and the night acquired a comfortable, hand-crafted glow.
Steps
- Construct heart-shaped lanterns from sturdier papers with an inner frame to hold their shape.
- Insert battery-operated LED lights or small fairy lights inside each lantern for safe illumination.
- Attach lanterns to a string or twine at regular intervals for even spacing.
- Secure the string between posts or hooks and adjust height for a balanced display.
- Light the lanterns in the evening to create a warm, inviting ambiance outdoors.
Delightful paper lace doily garland across mantel

A garland of paper lace doilies across a mantel felt both nostalgic and sweet, like a gentle nod to afternoons spent with scissors and tea. Each doily had tiny cutwork that created detailed shadow patterns when lit from below, and the overall effect was one of layered delicacy.
The doilies fluttered very slightly when doors opened, and the crisp sound added a domestic rhythm to the room. Arranged with small sprigs or dried florals, the garland softened a mantel into a gentle vignette that encouraged a slower pace in the space.
Steps
- Prepare a series of paper lace doilies and space them along a length of twine or ribbon.
- Attach doilies by folding a small section over the twine and securing with glue or stitched thread.
- Add small decorative elements like dried sprigs or tiny hearts between doilies for variety.
- Drape the garland across a mantel or shelf and adjust spacing for balanced drape.
- Complement with low lighting to accentuate the lace shadows on the wall.