I keep a ragged tote of fabric scraps that somehow always grows no matter how many tiny projects I finish. Pulling handfuls from that bag has become a small ritual; there’s a particular joy in matching a soft floral with a bright stripe or finding a perfect scrap that fits an idea.
Scrap Fabric DIY Projects have turned seconds of idle time into cozy, tactile pieces around my home.
Over the years those odd pieces have become cushions, tiny gifts, and little functional items that feel personal. Working on Scrap Fabric DIY Projects taught me to pay attention to texture, color clashes that actually work, and the quiet thrill of turning remnants into something useful and warm.
Patchwork pillow from leftover fabric squares
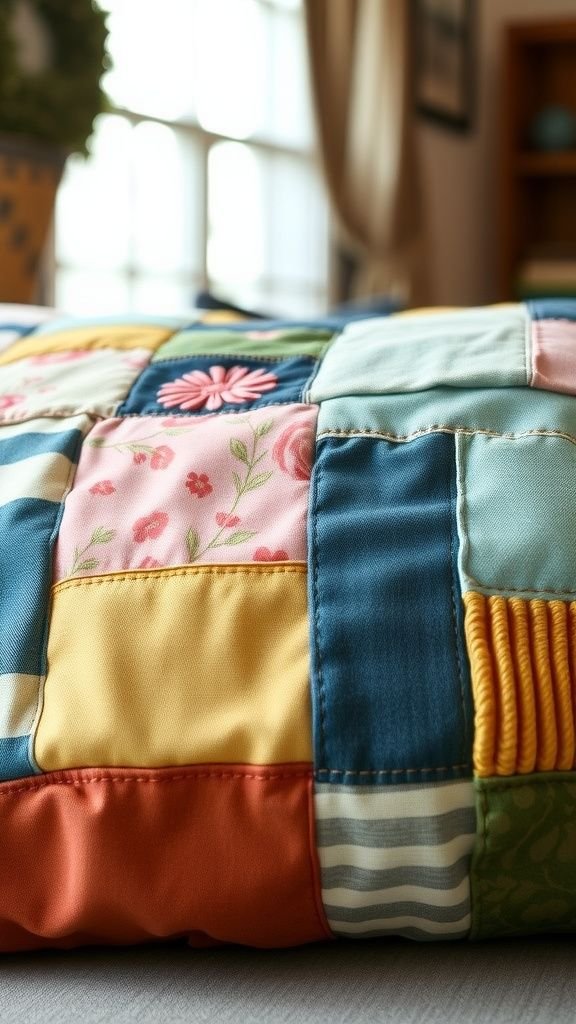
My patchwork pillow started as a stack of little squares rescued from hemming scraps and single sleeves. The surface is a mix of cotton florals, thin denim, and a leftover corduroy piece that still smells faintly of the old outfit it came from.
Hand stitching gave the seams a slightly uneven, human touch that I find comforting. When the afternoon light hits the pillow, seams create a soft shadowed grid and the different weights of fabric lend a cozy, slightly lumpy feel that begs to be propped under a reading elbow.
Steps
- Arrange fabric squares into a pleasing layout, balancing color and texture across the surface.
- Sew squares together in rows and join rows to form a front panel, keeping seams even.
- Create a backing panel from a single scrap or pieced scraps, then join front and back along three edges.
- Insert stuffing or a cushion insert through the open edge and close with a neat seam.
- Add optional topstitching around the perimeter for a finished look.
Rag rug braided from narrow fabric strips
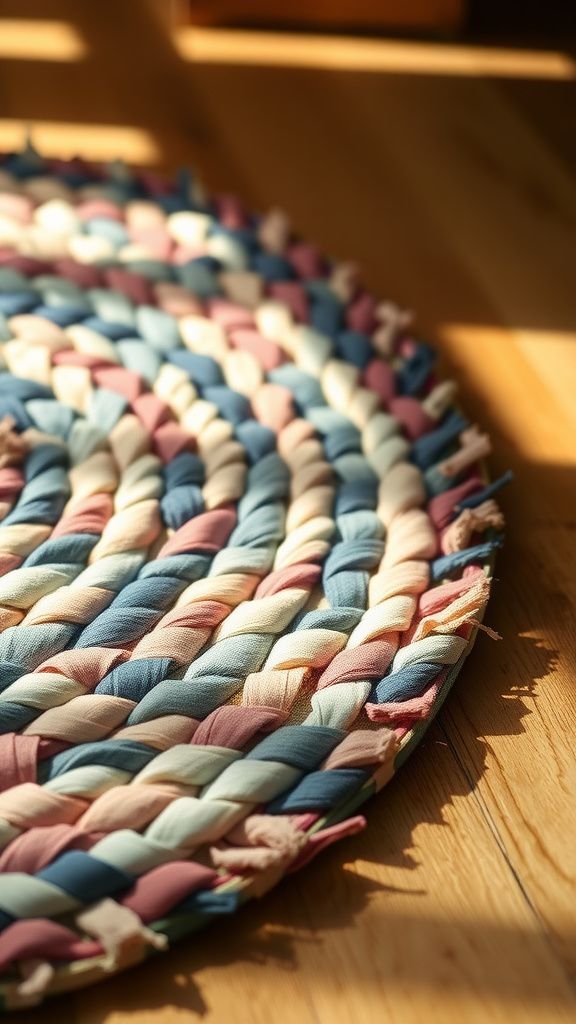
A braided rag rug grew out of a stack of old bedsheets and cotton shirts that had lost their shape. The surface is pleasantly irregular, with strips of soft cotton and some sturdier shirting twisting into a thick, forgiving braid.
My feet found it welcoming on cool mornings; the surface absorbs the little noises of bare toes and gives with an easy spring. The colors mixed into an accidental ombré where pastel sheets met deep denim, and the finished edge has a tactile, hand-made charm that feels quietly proud on the floor.
Steps
- Cut fabric into long, even strips and knot groups together to form long strands.
- Braid three strands together loosely, spiraling outward to create a circular or oval rug.
- Stitch the braided rows together with strong thread, ensuring the rug stays flat.
- Finish the outer edge by tucking or stitching the end strips securely.
- Trim stray threads and press lightly to even the surface.
Colorful fabric bunting for a cheerful corner

The bunting that hangs above my little desk was an experiment with odd triangles and tiny repeats. Each pennant carries its own history; a polka-dot from a skirt, a linen scrap from table napkins, a cotton square that once belonged to a child’s dress.
When the string sways slightly, the fabric edges show small frays and tiny stitches that catch the light. It brings an immediate sense of celebration to an ordinary wall without shouting; the mix of textures makes the whole line feel like a slow parade of memories rather than a manufactured decoration.
Steps
- Cut triangular pennants from assorted scraps, keeping the base widths consistent for a balanced look.
- Create a fabric or ribbon casing along the top of each pennant and thread a length of bias tape or cord through.
- Space pennants evenly along the cord and secure by stitching or tacking at intervals.
- Attach hooks or tape to hang the bunting from a wall, shelf, or window frame.
- Adjust spacing and orientation until the garland hangs with gentle drape.
A small bowl made from coiled fabric strips
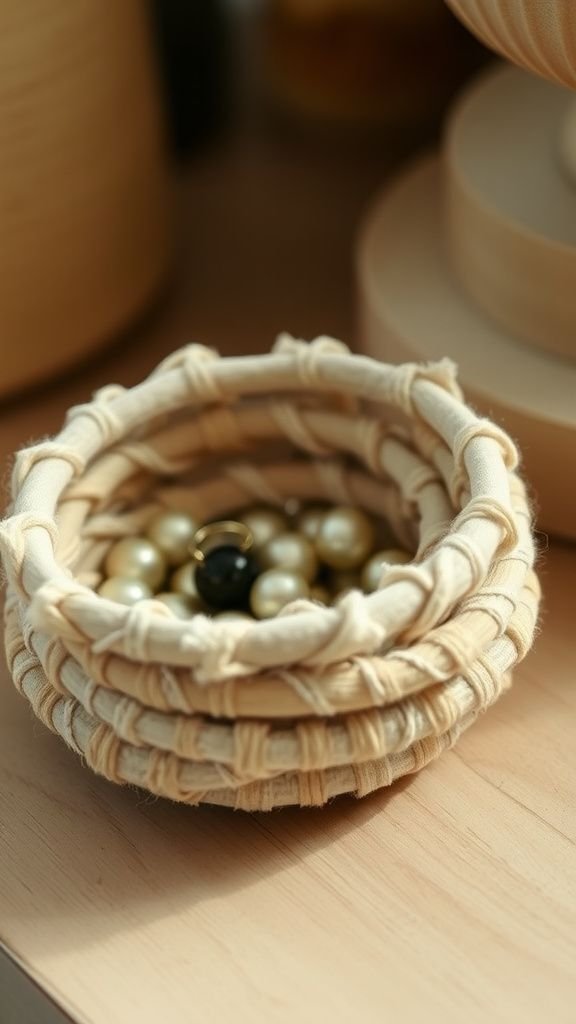
The fabric bowl on my dresser started as an experiment in patience. Thin strips of cotton were wound tightly and stitched along their length, forming a soft rope that felt pleasantly thick between my fingers.
Coil after coil the bowl rose, the inner curve catching loose jewelry and the occasional note. The textures fold into one another where printed cotton meets plain linen, and the rim has a slightly wobbly character that somehow feels deliberate.
It holds small things with casual dignity and looks like it has grown from the material itself.
Steps
- Prepare long strips of fabric and fold or wrap them around a core to create a sturdy coil.
- Hand- or machine-stitch the coil as it builds, securing each round to the previous.
- Continue coiling and stitching until the desired bowl size is reached, shaping sides gradually.
- Finish the rim with a neat stitch and tuck any loose ends into the last coil.
- Press gently and allow the piece to relax before placing items inside.
Quilted mug rug with playful scrap patches

My mug rug collection grew from evenings when a coaster felt too ordinary. Tiny patches of left-over prints were arranged with a small border and a hint of batting underneath, which created a pillowy little rectangle.
The quilting lines formed soft ridges that caught drips and warmed hands as a mug rested on top. A faint scent of detergent lingered in some pieces, bringing a domestic, lived-in quality.
Each mug rug has its own personality; some look jaunty with bright colors, others are quiet and muted, but all are tactile and satisfying to touch.
Steps
- Arrange small fabric patches into a compact rectangle and stitch them together to form a top layer.
- Layer the top with batting and a backing fabric, aligning edges evenly.
- Quilt through all layers with straight or decorative lines to secure the sandwich.
- Trim edges and apply binding around the perimeter for a neat finish.
- Press lightly and let the piece lie flat before use.
Patchwork tote bag: roomy and delightfully mismatched
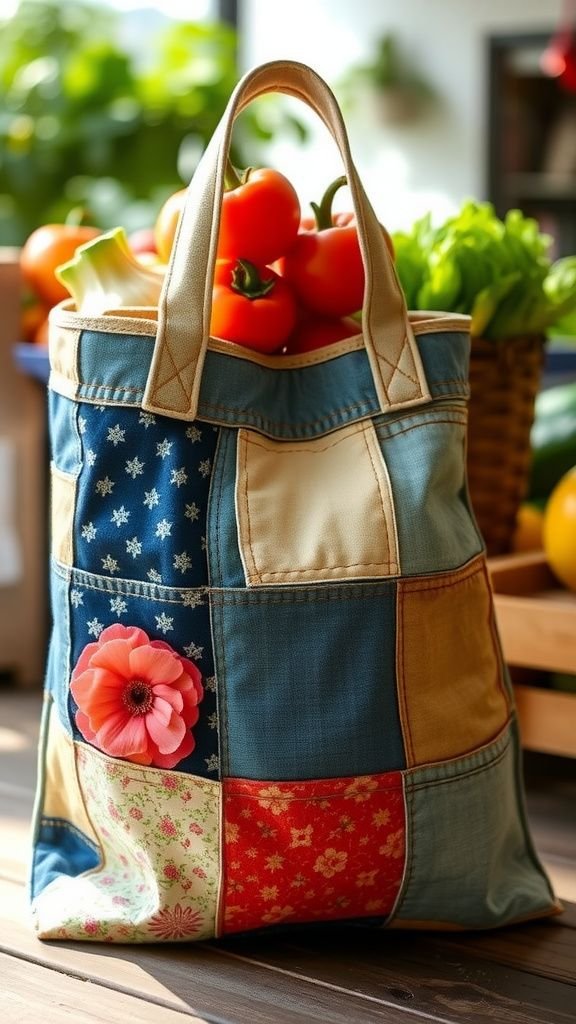
The tote I reach for most days is a collage of mismatched fabrics sewn into panels and joined with a heavy stitch. The handles are made from a sturdier scrap that used to be a pair of pants, now softened from repeated carrying.
Inside, a few small pockets keep pens and receipts from migrating to mysterious corners. That bag carries groceries and a paperback the same way, its surface collecting smudges and softening with each outing.
The seams show moments of hurry and careful mending, giving it a lived-in friendliness that a new bag never quite had.
Steps
- Piece together front and back panels from scrap patches, reinforcing stress points with extra stitching.
- Create a boxed bottom by folding corners and sewing across to allow depth.
- Prepare and attach handles, anchoring them securely to the bag body.
- Add interior pockets by sewing small rectangles onto the lining before assembling.
- Sew lining and outer panels together, turn right side out, and topstitch for strength.
Soft scrunchies from silky leftover trims

I made a handful of scrunchies the evening I found a box of silky trims and narrow ribbons. Each one is soft against hair, with a gentle bounce that doesn’t drag or pull.
Some have a subtle sheen that catches the light when caught in a hurried hand, others are matte and restful. The thin elastic inside hums with memory and the fabric gathers into soft ruffles that feel nostalgic, like a small fashion relic.
They stack neatly in a tiny dish and are often gifted to friends who appreciate the small comforts of tender fabric.
Steps
- Cut fabric strips slightly longer than the intended scrunchie circumference and fold or hem the long edges.
- Sew the long edge to form a tube, then turn it right side out.
- Thread elastic through the tube, tying the elastic securely to size.
- Join the fabric tube ends together with a hidden seam, enclosing the elastic knot.
- Adjust gathers evenly and trim any loose threads for a neat finish.
Handy fabric coasters for coffee and tea cups
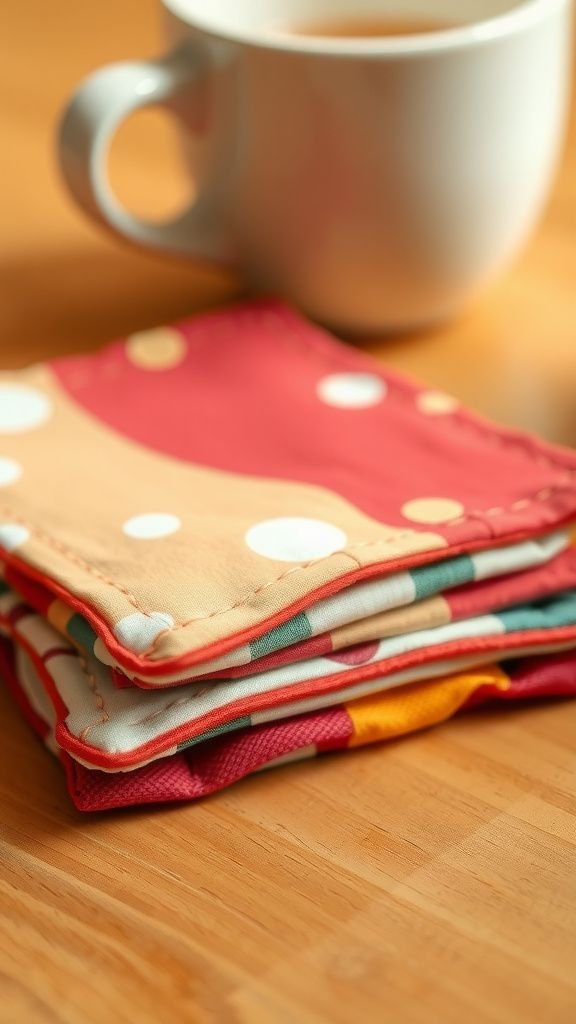
These little fabric coasters have an endearing weight from their layers of padding and fabric. I like the way a warm mug leaves a faint impression in the textile, a little memory of where coffee sat an hour ago.
The edges are often bound in a leftover bias strip that adds a tidy rim and a contrasting flash of color. They stack unevenly, each one showing its own personality depending on which scraps were used that day.
Sitting on a wooden table, they add warmth without calling attention to themselves, quietly protective under a morning cup.
Steps
- Cut paired fabric squares and a slightly smaller piece of batting for the middle.
- Layer fabric, batting, and backing and stitch around the perimeter, leaving a small opening.
- Turn right side out through the opening and press gently to flatten edges.
- Topstitch close to the edge or quilt concentric circles to secure layers.
- Close the opening with a neat slip stitch or topstitching to finish.
A tiny fabric journal cover with hidden pockets
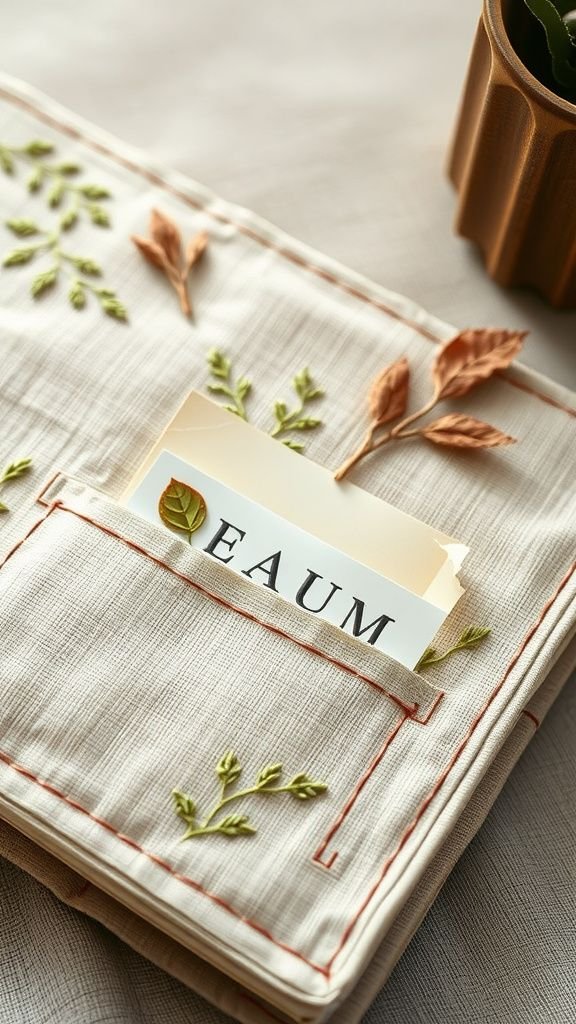
The journal cover I keep by the bed found its life in a narrow strip of embroidered cloth and a patch of vintage linen. The inner pockets shelter a ticket stub and a pressed leaf that I keep for no real reason.
The cover wraps the notebook like a small quilted hug, and the edges have softened from being opened and closed. Sometimes pages stick slightly to the linen on humid nights and the texture of the fabric becomes part of the reading experience.
Its presence encourages a few lines of writing on restless evenings.
Steps
- Measure the notebook and cut outer, lining, and optional batting to size with extra for pockets.
- Create inner pockets by folding and stitching smaller fabric rectangles onto the lining piece.
- Layer the outer fabric, batting, and lined interior and stitch around edges, leaving an opening.
- Turn right side out, press, and topstitch around the perimeter for durability.
- Slip the notebook into the folded pockets and adjust for a snug fit.
Tiny fabric button magnets: colorful and tactile
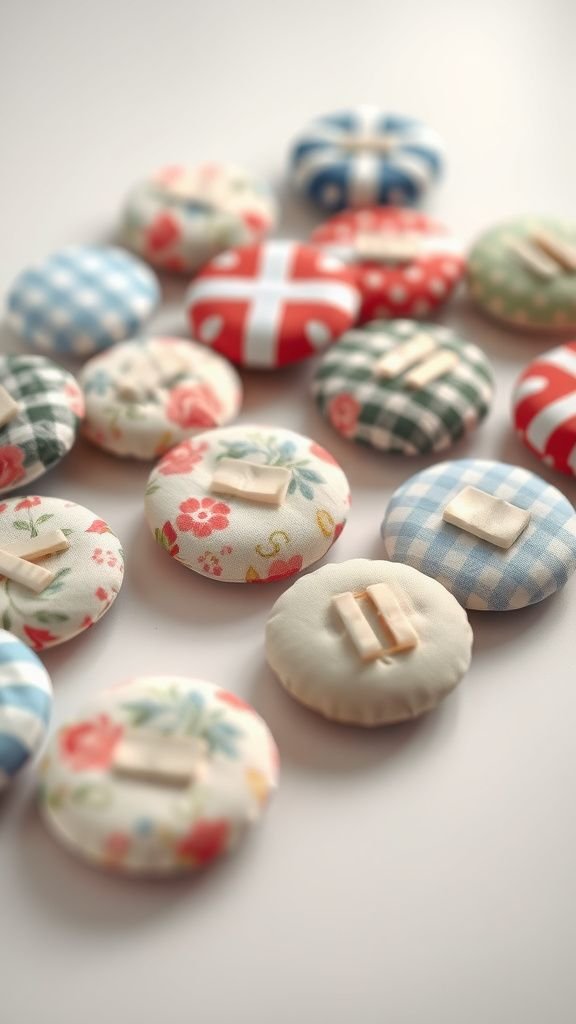
A cluster of fabric-covered button magnets sits on my fridge, each one a miniature collage of print and color. The round fabric domes hold a little stiffness from interfacing, and the edges show tiny pleats where cloth was eased over the shell.
When bumped, they rattle softly against photos and grocery lists, anchoring small moments to the metal surface. They feel like carefully kept secrets; each patterned piece invites a closer look, and the tactile roundness is oddly satisfying to press between a thumb and forefinger while waiting for the kettle.
Steps
- Cover metal or plastic button shells with chosen fabric scraps, trimming excess neatly.
- Secure fabric inside the button shell according to the button kit or by stitching.
- Attach a small, strong magnet to the back of each covered button with adhesive or stitching.
- Allow adhesives to set, then test magnet strength against a metal surface.
- Group magnets on the fridge to display photos or notes attractively.
Denim pocket organizer: old jeans finding a job

The pocket organizer was salvaged from an old pair of jeans that had generous back pockets full of past receipts. Hung on a pegboard, the denim pockets keep tools, pens, and little scissors accessible.
The fabric has softened from wear, and the doubled seams create sturdy edges that brace whatever goes inside. There are faint fade marks and a small repair near the hem that tell the story of repeated use.
The texture of denim pairs well with cotton scraps used for lining, making the piece rugged yet domestic in a way I appreciate every time I reach for a tool.
Steps
- Cut pockets from a pair of jeans, leaving seam allowances intact for strength.
- Layer and stitch a backing fabric or interfacing to add stability to each pocket.
- Arrange pockets on a fabric or board backing and topstitch around edges to secure.
- Add hanging hardware such as loops or grommets to mount the organizer.
- Hang on a wall or pegboard and fill pockets with small tools and supplies.
A cheerful patchwork table runner for weekday meals
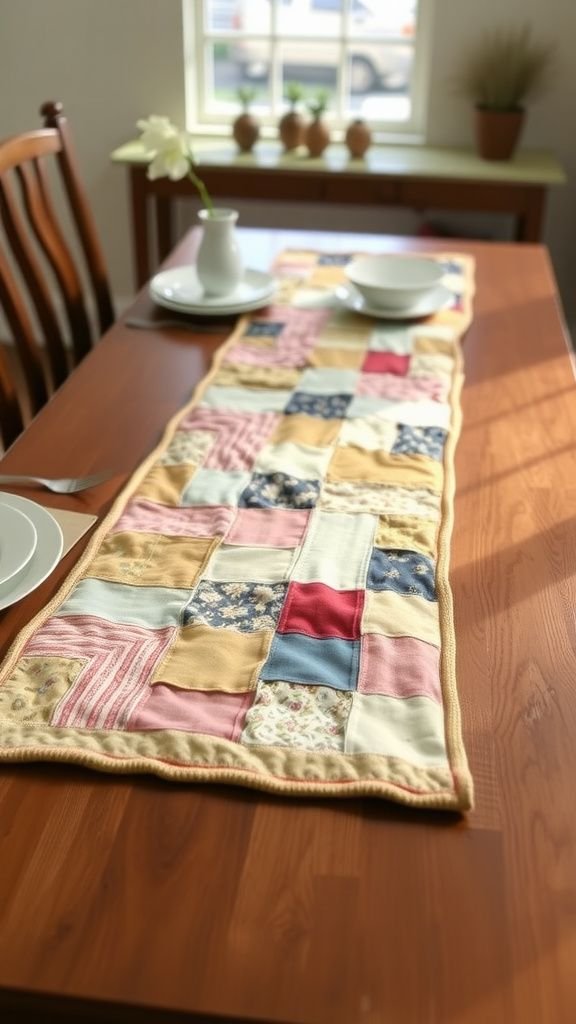
The table runner came together from long strips of left-over quilting cotton in colors that didn’t seem to match anyone’s set. On the dining table it looks deliberate, a meandering stripe of pattern and calm.
The runner picks up crumbs and napkin folds with a forgiving surface, and the slight thickness from batting muffles clinks from plates. Light from the window plays across seams and makes the floral pieces glow, while darker prints keep the overall rhythm grounded.
It changes the mood of a quick meal, lending an unforced sense of occasion.
Steps
- Sew fabric strips or blocks together along their long edges to the desired runner length.
- Add batting and a backing fabric, aligning edges smoothly.
- Quilt longitudinally or with decorative stitches to hold layers together.
- Trim edges square and attach binding around the perimeter.
- Press the runner flat before placing on the table.
Padded eyeglass case for delicate lenses
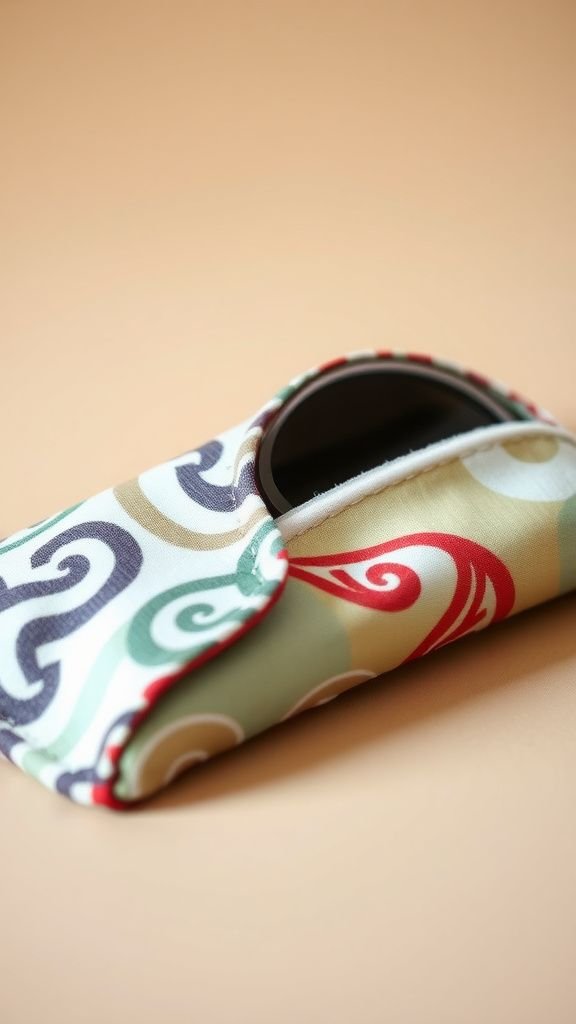
The eyeglass case began as a smidge of fleece sandwiched between two patterned scraps. The padding gives a protective softness that feels reassuring when the glasses slide in.
The outer fabric has a faded charm and the lining is a silky scrap that resists snagging. When it sits in a bag, the case keeps lenses away from stray receipts and keys; it has small puckers where seams meet that look hand-made and kind.
Pulling glasses out has a satisfying tug on the smooth fabric, like opening a tiny present each time.
Steps
- Cut two outer fabric pieces and a slightly smaller piece of padding to eyeglass dimensions.
- Layer outer fabric with padding and a smooth lining, sewing around three edges.
- Turn right side out and press gently, forming a neat pocket.
- Add a flap to one end and secure with a snap, button, or hook-and-loop fastener.
- Topstitch around edges for reinforcement and a finished look.
Fabric-wrapped plant cozy for small pots
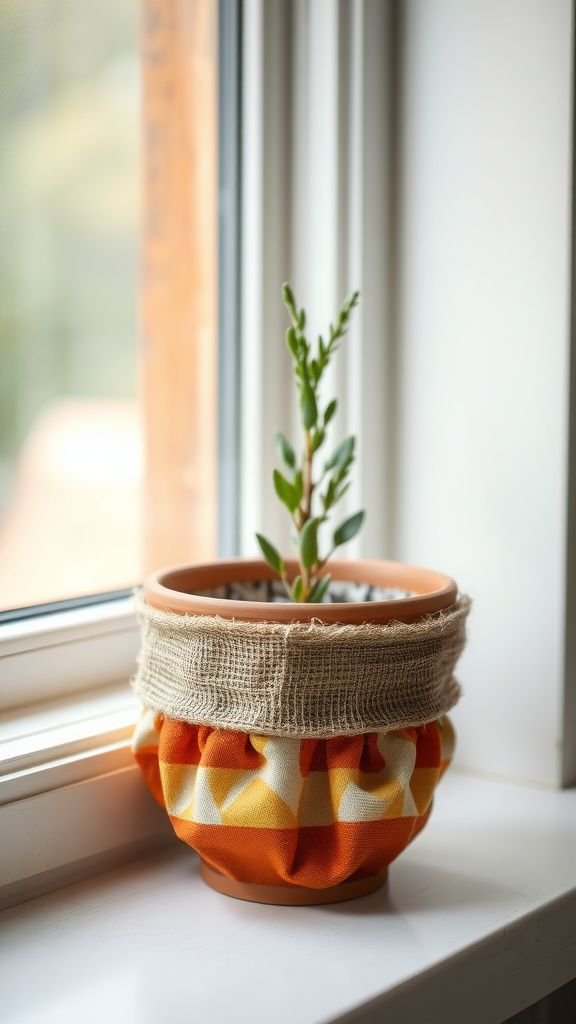
I wrapped a tiny terracotta pot in a strip of printed cotton and a scrap of burlap, and the plant seemed to grow into the new outfit. The cozy softens the hard rim of the pot and hides a chip in the glaze, while the colors complement the green of the leaves.
The fabric gathers slightly at the base, creating a little ruffle that catches dust in a friendly way. When water rolls down the sides during watering, the fabric darkens temporarily and then dries with a faint scent of soil and sun baked into the weave.
Steps
- Measure the pot circumference and cut a fabric strip with extra allowance for overlap.
- Wrap the fabric around the pot, folding the top for a neat edge, and secure with stitching or adhesive.
- Add a lining if needed to protect fabric from moisture, attaching it inside the wrap.
- Tuck and stitch fabric neatly at the base to create a stable fit.
- Place potted plant inside and adjust fabric for an even cozy look.
A playful stuffed toy sewn from childhood scraps

A small stuffed toy holds patches of childhood: a sleeve with a cartoon print, a square of flannel that was once a favorite blanket. The seams show hand-sewn repairs and the stuffing has settled into a pleasantly lumpy shape that fits comfortably in a palm.
It smells faintly of old laundry and every stitch feels like an affectionate mark. When set on a shelf it looks slightly tired, like a friend who’s seen many naps.
The facial features are embroidered with uneven stitches that give the toy a quirky expression someone always comments on with a smile.
Steps
- Trace and cut toy shapes from scrap fabrics, including front, back, and small appliqué pieces.
- Stitch appliqué features onto the front piece and embroider facial details as desired.
- Sew front and back pieces together, leaving an opening for stuffing.
- Stuff with polyester fill or other soft scraps, then close the opening with a ladder stitch.
- Add small decorative stitches or buttons for extra character, securing them firmly.
Pincushion made from tiny square remnants
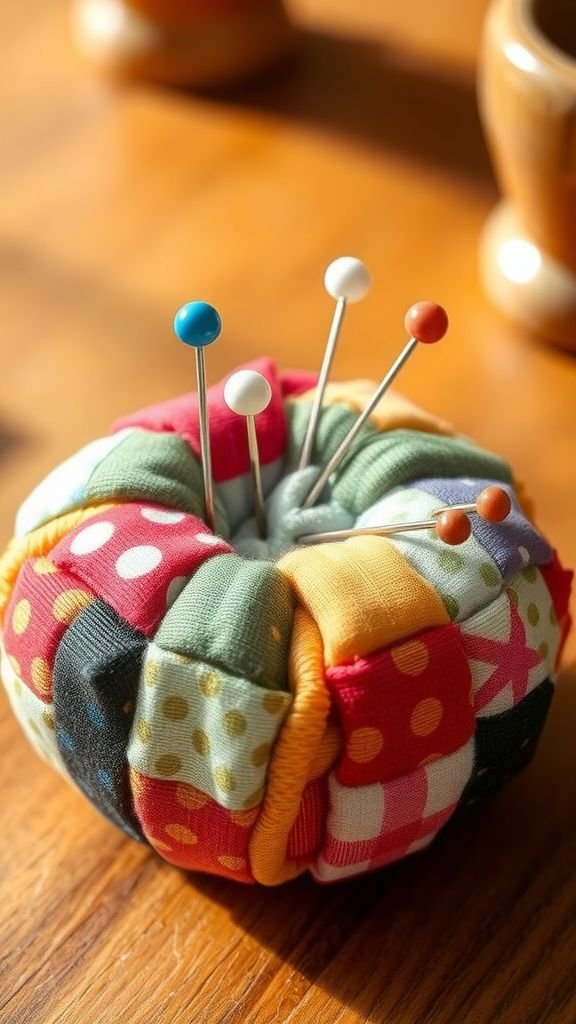
The pincushion on my sewing table began as a stitched bundle of tiny squares, stuffed until it held shape with cheerful puffiness. A ring of decorative tacking gathers the center, and pins appear like small flags whenever I work.
The cushion bears the faint scent of old soap and thread, and each poke seems to pay homage to a past project. I like lifting it to feel the welcoming resistance under pins; that little object anchors the whole table, its soft bulk both practical and strangely comforting in a room of sharp tools.
Steps
- Sew small fabric squares together to form a compact shape or cut a circle for a classic pincushion.
- Create a fabric pocket and fill with stuffing or crushed walnut shells for weight.
- Stitch the opening closed tightly and add a tacking stitch across the top to form a dimple.
- Decorate with a button or a ring of decorative stitches around the center.
- Place on the sewing table and add pins as needed for use.
Quilted pot holders with comforting heft and color

Quilted pot holders live on my oven handle like a pair of tiny, dependable guardians. The batting gives a comfortable heft that stands up to hot pans, and the outer fabrics carry prints collected over time.
The quilting lines have a rhythm that comforts my eye, and the loop for hanging is a little strip of stubborn fabric that somehow survived an entire garment. They darken at the edges where hands inspect them, and each smudge and faint burn mark becomes part of the story, small merits of a kitchen well used.
Steps
- Cut two outer fabric squares and a piece of heat-resistant batting to size for each pot holder.
- Layer outer fabric, batting, and backing, then quilt through all layers to secure them.
- Trim edges square and apply binding around the perimeter, including a small hanging loop.
- Topstitch the binding in place for durability.
- Test the pot holder with warmth exposure and adjust quilting density if needed.
Fringe wall hanging made from mixed fabric scraps

The wall hanging is a tangle of textures: soft cotton ribbons, thin wool strips, and a few metallic threads that catch morning light. The fringe descends in layers, creating a soft waterfall that whispers when someone walks by.
Its movement and texture turn a blank wall into something tactile and slow, a place where colors overlap without strict order. I find myself smoothing a stray strand absentmindedly and noticing the small accidents where colors mingle into new tones.
It feels like a textile conversation, low and steady, that warms an otherwise plain corner.
Steps
- Prepare a wooden dowel or branch as the hanging support and cut fabric strips in assorted lengths.
- Knot or loop strips onto the dowel in layered rows to build density and texture.
- Trim the bottom edge to create a balanced silhouette or leave uneven for organic movement.
- Add decorative elements like beads or woven bands if desired.
- Attach a hanging cord to the dowel and mount on the wall.
Fabric key fob from narrow scrap strips

The key fob clipped to my bag is a little loop of textile continuity. Narrow strips of sturdy fabric were folded and stitched into a slim band that feels reassuring in hand when rummaging.
The hardware has a faint patina that plays nicely against the bright thread of the fabric. It’s long enough to slip over a wrist in a rush and short enough to hang flat when clipped.
The surface has a few rub marks where it brushes against coins, and those tiny abrasions add personality rather than age, a small ledger of daily movement.
Steps
- Fold and stitch narrow strips of sturdy fabric to form a band with clean edges.
- Attach one end to a keyring or swivel clasp using a reinforced seam or rivet.
- Fold the band to size and secure the opposite end over the hardware base.
- Topstitch along the length for strength and decorative effect.
- Trim threads and attach keys, testing the security of the connection.
Cord organizer: neat wraps for electronic cables
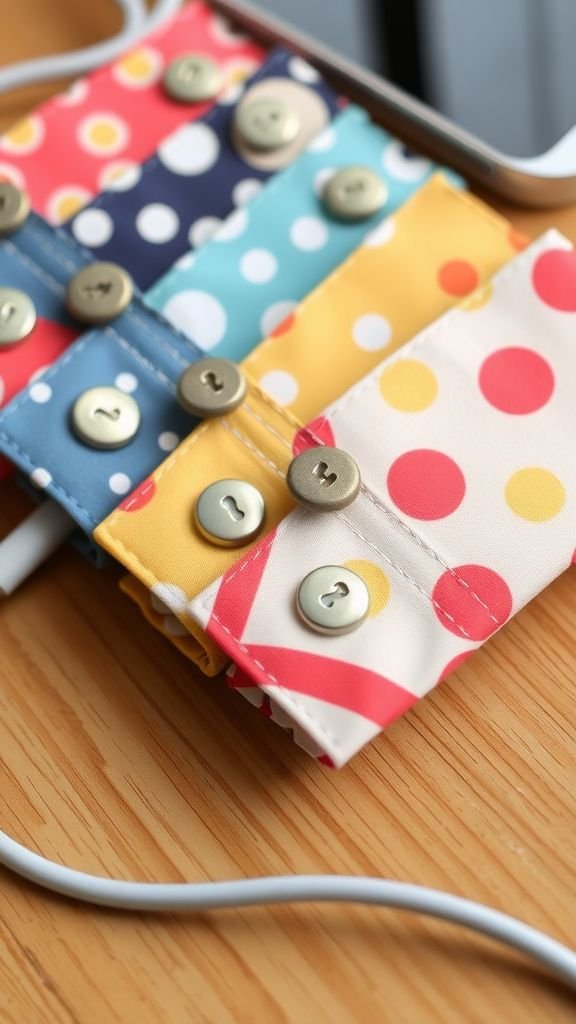
The cord organizers tamed a drawer overflowing with earbuds and chargers. Small fabric rectangles fold into tidy bands that snap closed, keeping cables from tangling into anxious nests.
The lining has a soft feel that protects delicate plugs, and each organizer carries a small color cue so cords are instantly recognizable. Stored in a box, they make the drawer look calmer; pulling one out is a small, satisfying motion.
The fabric edges soften over time, and the snaps gain a faint warmth from repeated handling that somehow makes the whole drawer feel more personal.
Steps
- Cut small rectangles of fabric and optional padding to create a soft band.
- Fold fabric into a loop and sew or press edges to form a neat strip.
- Install a snap or sew a button and loop to secure the band when wrapped around a cord.
- Test with different cable thicknesses and adjust band length if needed.
- Store organizers in a drawer or pouch for easy access.
Fabric bookmarks with embroidered edges
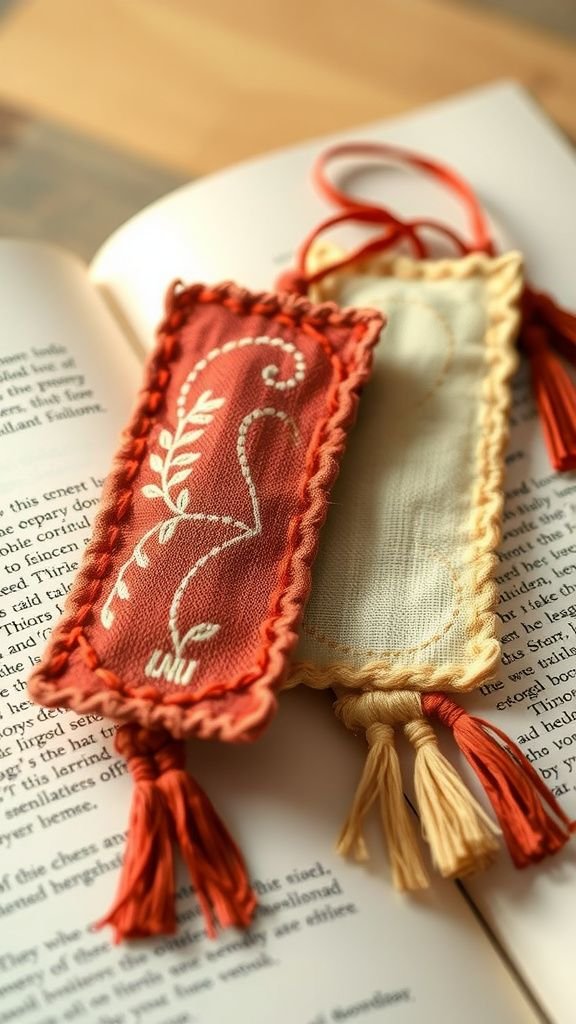
Bookmarks stitched from narrow scraps keep my place in books that get reread. Thin but reinforced with interfacing, they slip into pages without bulk.
A tiny embroidered motif or a decorative running stitch often marks one end, and the fabric grain slips smoothly between paper fibers. Over time pages near the bookmark pick up a faint impression from the fabric pattern, which I find oddly comforting.
These little strips carry a small private pleasure: lifting the bookmark often brings a moment of recognition and the soft texture feels like a small ritual.
Steps
- Cut narrow rectangles from scrap fabric and fuse an intercepting layer for stiffness if desired.
- Fold edges and stitch around to create a neat finished rectangle.
- Add embroidery or decorative stitching along one edge for detail.
- Optionally attach a tassel or ribbon to the top edge.
- Press lightly and slide into a book for gentle use.