I still have a memory of cutting tiny shamrocks at the kitchen table while sunlight pooled on the surface and a mug of tea steamed nearby. Those small green shapes and the way glitter caught the light turned simple afternoons into something warm and playful.
Saint Patrick’s Day DIY Crafts have that quiet charm for me: low fuss, lots of texture, and small surprises that make a room feel friendlier.
Over the years I’ve kept a handful of go-to ideas that are easy to adapt when a last-minute craft mood arrives.
These projects favor found materials, bright greens, and textures that invite touching, laughing, and keeping a little handmade token for a pocket or mantel.
Paper shamrock garland for window cheer

There is a joyful rustle when a string of paper shamrocks catches a draft, each heart-shaped leaf offering a slightly different green. I love the crisp snap of cardstock and the soft shimmer from a dusting of glitter that refuses to stay in one place.
It brings a hint of afternoon light and the sound of kids at play to a sill. The garland sits casual across a curtain rod or draped along a bookshelf, and it always feels like a small, handmade invitation to notice the day.
Steps
- Gather green cardstock in a few shades, pencil, scissors, a hole punch, and thin twine.
- Trace heart shapes and snip each shamrock silhouette so edges are clean and slightly varied.
- Punch a small hole near the top of each shape and thread onto the twine, spacing by eye.
- Knot the twine ends and arrange the garland across a window or along a shelf so light highlights the layers.
Rustic clover wreath from twine and moss

The scent of dried moss mixed with twine feels unexpectedly homey, like a walk through a backyard after rain. A small wreath made with wrapped twine and tucked greenery has a quiet, earthy presence on a door or over a mantle.
I appreciate the contrast between rough natural fibers and the rounded softness of faux clover leaves. When hung, the piece has weight and texture that makes guests pause, and the muted greens are calming in a room of brighter decor.
Steps
- Collect a circular base, natural twine, patches of sheet moss, and a handful of faux clover sprigs.
- Wrap the twine around the base until the surface feels evenly covered and rustic in appearance.
- Tuck moss into the wrapped twine in small clusters for layered texture, spacing clover sprigs among the moss.
- Secure loose edges by pressing gently and hang so the wreath reads as an organic, textured circle.
Lucky coin mason jar luminary with shimmer

A mason jar warmed by a flicker casts tiny gold specks when the light meets the jar’s surface and a scattering of faux coins. I enjoy how a simple rim of metallic coins changes the mood at dusk, lending a gentle glow to a porch or table.
The glass catches reflections while the coins add a playful wink. At night, the luminary hums with candlelight and the faint smell of wax, giving an ordinary jar an unexpectedly cozy, celebratory presence.
Steps
- Gather a clean mason jar, small metallic coin tokens, translucent tissue or vellum, and a battery tea light.
- Line the jar interior with a layer of tissue or vellum so the light becomes soft and diffused.
- Adhere coin tokens near the rim for a decorative band that catches the glow.
- Place the battery tea light inside and arrange several jars for a clustered, warm display.
Felt shamrock brooch with cozy texture

A felt shamrock brooch carries a softness that invites touch, the edges slightly fuzzy where the fabric meets air. I remember pinning one to a wool coat and feeling a tiny thrill when someone smiled at the detail.
Layers of felt in different greens create a subtle depth, and the backweight of a small brooch clasp gives the piece presence without heaviness. It looks gentle on a lapel or on a knitted hat, offering quiet color that feels personal and handcrafted.
Steps
- Choose two to three shades of felt and a small metal brooch backing with a pin.
- Trace a shamrock shape onto the felt layers and snip each shape so the edges remain soft.
- Stack the felt pieces for depth and adhere the layers at the center for stability.
- Secure the brooch backing to the rear so the pin sits flush and the shamrock presents neatly.
Button shamrock art on reclaimed wood panel

Buttons collected from an old tin find a new life when arranged into a shamrock silhouette on reclaimed wood. Each button brings its own gloss, size, and history, and when clustered they create a little landscape of circles and color.
The wood grain peeks through at the edges, lending a lived-in backdrop that balances the cheerful buttons. I like how this piece sits on a shelf, slightly askew, with a mixture of matte and shiny buttons catching the light at different angles.
Steps
- Select a small reclaimed wood panel, a collection of green buttons in mixed sizes, and a pencil.
- Sketch a gentle shamrock outline on the wood surface to guide placement of the buttons.
- Arrange buttons within the outline, starting with larger pieces to anchor the form and filling gaps with smaller buttons.
- Once the composition feels balanced, secure each button in place so the artwork reads as a textured shamrock.
Rainbow paper straw centerpiece for the table

A cluster of colorful paper straws becomes unexpectedly festive when organized into a tiny rainbow bouquet. The crisp stripes of each straw catch the light and the paper edges have a soft, papery sound when they brush together.
Tied gently at the base, the arrangement gives off a playful, childlike energy that brightens ordinary surfaces. I often set one on a dining table while making tea, and the simple arc of color shifts the mood to something more playful and celebratory.
Steps
- Gather a variety of striped paper straws, a small vase or jar, and ribbon or twine for a base tie.
- Group straws by color to form a curved rainbow arrangement and place them into the jar so colors flow naturally.
- Secure the bundle at the base with ribbon so the straws keep their curved formation.
- Set the jar centrally on a table as a bright, lightweight centerpiece.
Leprechaun hat favor boxes for sweet surprises

Tiny boxes shaped like a leprechaun’s hat feel whimsical in hand, with a matte band and a small metallic accent that catches light. I like the moment of opening one and finding a little treat inside; the crisp paper folds and the soft clink of coin-shaped confections make it feel like a small ritual.
Placed at place settings or clustered on a table, the hats read as both decor and promise of a small delight. They bring a playful wink without overwhelming the table.
Steps
- Select cardstock in deep green and black, plus a small square for a metallic buckle accent.
- Score and crease the cardstock to form a low hat shape with a flat brim for stability.
- Assemble the hat form by bringing edges together and securing them so the box holds its shape.
- Tuck a few wrapped sweets inside and close the lid so each box reads as a tiny, festive favor.
Salt dough shamrock keepsakes with rustic charm

The tactile feel of warm salt dough sliding under fingertips brings childhood crafting nostalgia. Each shamrock holds tiny fingerprints and slight surface imperfections that read as character rather than flaw.
After drying, the pieces gain a faint ceramic weight and a subtle matte finish that invites holding. Displayed in a bowl or gifted to a friend, these keepsakes carry a simple honesty; the scent of the baked dough remains faintly in the air, an echo of afternoons spent shaping memories around a kitchen table.
Steps
- Mix a simple dough of flour, salt, and water until it forms a pliable mass.
- Roll the dough to a modest thickness and press a shamrock cutter or a traced template gently into the surface.
- Lift the shapes onto a baking sheet and dry them until firm, then let cool fully.
- Finish with a light glaze or color wash if desired and keep the pieces as small, tactile keepsakes.
Yarn rainbow wall hanging with soft tassels

A hand-draped rainbow made from thick yarn brings soothing rhythm to a wall, the strands catching light and sinking slightly when touched. The texture is plush and invites fingers to trace the gentle arches while tassels drift like tiny waterfalls.
I enjoy how the muted greens and complementary colors anchor a corner without feeling fussy. Hung over a reading nook, it feels like a small, quiet promise—soft, colored arcs that offer a gentle focal point and a tactile presence in a room.
Steps
- Choose thick yarn in a palette that includes green and harmonizing hues, plus a small dowel for support.
- Wrap yarn around a form to create each arch, trimming ends and aligning layers for a smooth curve.
- Secure the yarn ends to the dowel and add tassels beneath each arch for movement.
- Hang the dowel on a single hook so the wall hanging reads as a soft, sculpted rainbow.
Clover corner bookmarks for green reading days

A corner bookmark shaped like a clover slips onto a page and brightens a book with a peek of green. The small triangle nestles at the paper edge with a satisfying, quiet hold.
I often find these in a bedside stack, bringing a smile when a dog-eared novel gets its tiny decorative guardian. The texture can range from smooth cardstock to soft felt, and the little clover leaf floats above the book like a gentle reminder of a slow, cozy read.
Steps
- Choose sturdy cardstock or felt in a favorite shade of green and trace a small triangle template.
- Fold and crease the triangle into a corner pocket shape so it slips onto a page snugly.
- Decorate the visible area with a clover silhouette and any lightweight embellishment for texture.
- Slide the finished bookmark onto a page and tuck it into a book to mark a gentle pause.
Gold coin wind chime from recycled bottle caps

When a breeze makes a bottle-cap wind chime sing, the tiny metal notes feel playful and bright. Each cap carries its own patina and a slightly different pitch, and when they clink together they create an impromptu, metallic melody.
Hung on a porch, the chime catches sunlight and casts tiny moving shadows. I enjoy how the recycled elements feel resourceful; what starts as a collection in a jar becomes a little instrument that lives outside and warms up a quiet corner.
Steps
- Collect clean bottle caps or small metallic discs and a sturdy hoop or driftwood for a top.
- Make small holes near each cap edge for threading cord or thin wire, keeping spacing varied for sound.
- String the caps at differing lengths and secure them to the hoop so they can move freely.
- Hang the chime where a light breeze encourages gentle metal murmurs and playful reflections.
St. Patrick’s Day card with watercolor wash

A handmade card with a soft watercolor wash feels quiet and personal, each bleed and grain showing an honest hand. The greens run into each other and leave tiny blooms where pigment pooled, creating an organic background for a small stamped or handwritten message.
I enjoy the smell of damp paper and pigment early in the drying, and later the smoothness under a signature. These cards sit flat in a basket until chosen, offering a simple, thoughtful way to send warm wishes across a table or a town.
Steps
- Select watercolor paper, a palette of greens, and a soft brush for gentle washes.
- Apply a loose wash across the card front, letting pigments mingle and create subtle blooms.
- Allow the paper to dry fully and add a small stamped motif or handwritten note over the wash.
- Place the finished card in a crisp envelope so it reads as a quiet, handmade message.
Leprechaun trap diorama with playful details

A tiny diorama designed to lure a mischievous leprechaun becomes a weekend project that invites storytelling. The miniature scene hums with imagination: a small door, a glittering trail, and a cleverly placed shiny object that promises mischief.
I like how making the scene encourages playful negotiation of scale — rocks become boulders and a thimble reads as a kettle. Children gather around with conspiratorial smiles, and the finished piece sits on a shelf until curiosity prompts a new addition or a small, triumphant rearrangement.
Steps
- Choose a shallow box or tray and collect small props like pebbles, ribbon, and a tiny container for a shiny lure.
- Arrange the elements into a compact scene with a clear entry point that suggests a path.
- Add height with folded paper or small blocks and decorate surfaces with glitter or metallic accents for temptation.
- Place the diorama where it can be observed and adjusted as the playful narrative unfolds.
Stamped green napkin set for festive meals
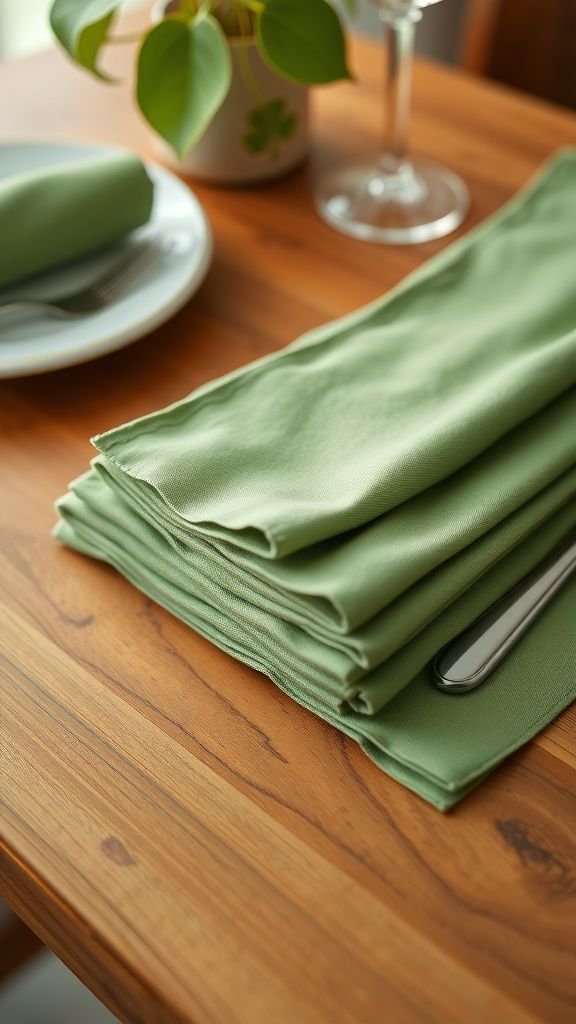
A stack of stamped napkins offers a subtle nod to celebration without shouting. The ink sits slightly above the fabric weave, and pressing the stamp leaves a faint texture that invites fingers to trace the motif.
I like folding one beside a plate and noticing how the pattern repeats in an understated way across the table. The cloth picks up soft scent from the laundry and shows faint creases that make everything feel used and human rather than staged.
Steps
- Choose plain cloth napkins and a small rubber stamp with a shamrock or geometric motif.
- Ink the stamp with fabric-safe ink and press it evenly onto each napkin to create a repeating pattern.
- Allow the ink to set and cure according to the ink instructions so it becomes washable and durable.
- Stack the napkins for table use so the stamped motif reads as a thoughtful detail.
Embossed foil shamrock ornaments with sheen

Shiny foil ornaments pressed with a shamrock pattern reflect a room and multiply tiny highlights. The embossed texture invites a closer look; ridges catch light and create shadows that read differently depending on angle.
Hung in a row, they seem to change expression as they turn in the air. I enjoy the small, crisp sound when they brush together and how they add a metallic whisper to a shelf or branch.
They feel festive without being fussy and hold their own among more natural decorations.
Steps
- Cut metallic foil sheets into circles or ovals for ornament bases and choose a small shamrock embossing tool.
- Place the foil over a soft backing and press the shamrock design so the pattern stands in relief.
- Trim any uneven edges and add a small loop of cord for hanging.
- Suspend the ornaments where light can catch their embossed surfaces and create subtle reflections.
Cork shamrock coasters for warm mugs

Cork coasters shaped like shamrocks sit pleasantly under a warm mug, their soft resilience absorbing touches and tiny spills. The surface is slightly textured, offering a gentle grip that keeps cups from wandering.
I like how the natural cork tone contrasts with bright green edges or a painted motif, and how the coasters stack neatly when not in use. Each one carries the faint, earthy scent of cork and a casual, practical charm that makes them feel like an everyday little gift.
Steps
- Obtain a sheet of cork, a shamrock template, and a pencil for tracing the shapes.
- Trace shamrock outlines onto the cork and snip them out carefully so edges remain even.
- Optionally add a thin border of color around the edge for contrast and allow it to dry.
- Group the coasters near a tea or coffee station so they serve as both useful and decorative pieces.
Mason jar fairy lights with green tint
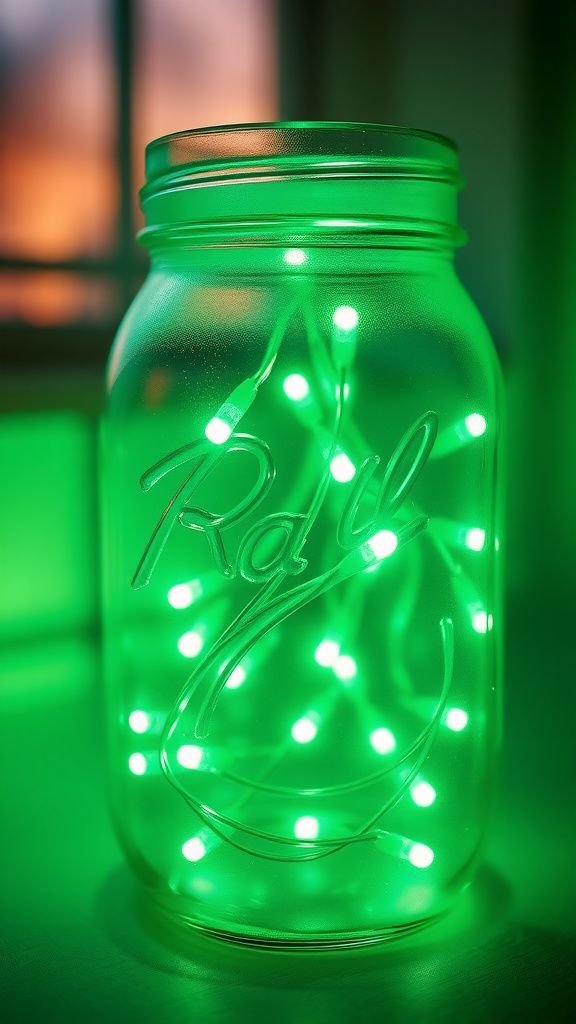
Tiny lights tucked into a jar glow through a faint green tint, creating soft pools of color that feel gentle at dusk. The glass refracts the bulbs into tiny stars while the jar rim adds a domestic silhouette.
I enjoy placing one on a porch step where it reads like a small lantern, offering a quiet welcome. The effect is understated and soothing, with the low hum of batteries and the soft amber of bulbs softened by the green hue into something restful.
Steps
- Select a clean mason jar and a string of low-heat fairy lights with battery pack.
- Line the jar interior with a translucent green film or a few drops of diluted glass-safe tint.
- Place the lights inside so the battery pack sits near the rim for easy access.
- Close the jar and position it where the gentle glow provides soft, ambient light.
Paper plate leprechaun masks for playful faces

A paper plate turned into a playful leprechaun mask has a friendly, handmade charm. The curve of the plate becomes a face, and bright colored accents around a small hat opening bring a cheerful character to life.
Kids love peeking through the eye holes and the lightweight mask moves easily with a nod and a grin. The surface takes crayons and markers in a way that feels immediate, and fingerprints in wet paint or marker always read as earnest marks of the making process.
Steps
- Start with a sturdy paper plate and mark eye openings and a small hat shape.
- Cut or snip the eye holes for visibility and adjust the plate edges so it fits comfortably.
- Decorate the surface with marker, paper accents, and a small band for the hat.
- Attach an elastic loop to hold the mask in place so it can be worn for playful moments.
Tie-dyed green bandanas for picnic flair
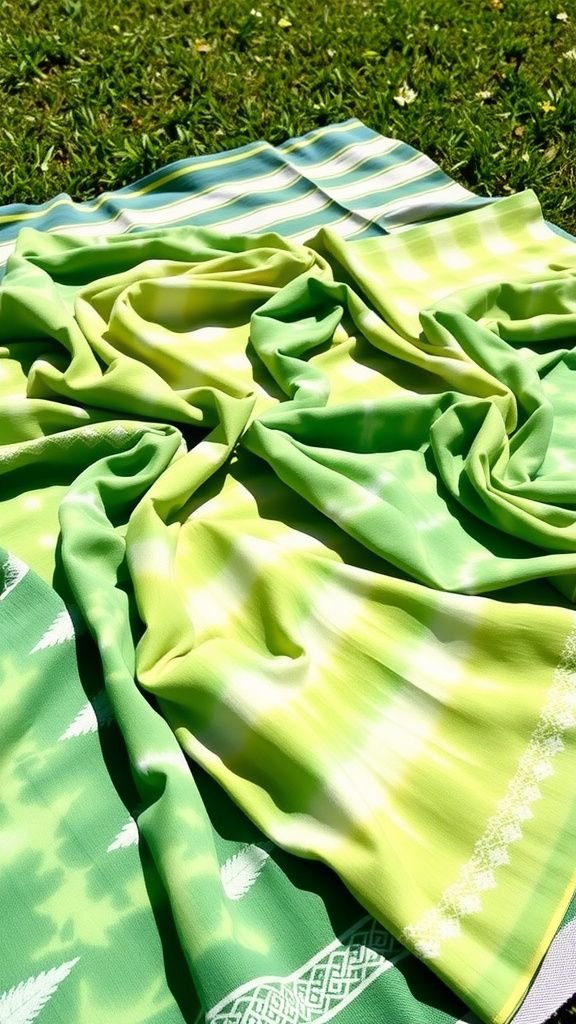
A tie-dyed bandana carries a casual, outdoorsy spirit, the greens pooling into organic shapes and soft edges. The fabric has a lived-in softness and the pattern feels like a map of small decisions and splashes.
I enjoy tying one loosely around a wrist or a basket handle, where it flutters and softens the scene. The dyes leave a faint scent at first, but then the cloth settles into a comfortable neutrality that pairs well with sunlit afternoons and shared sandwiches.
Steps
- Choose cotton bandanas and several shades of green dye prepared according to the dye instructions.
- Bind sections of the fabric with rubber bands to create resist areas that will remain lighter.
- Apply dye to the exposed fabric, allowing colors to mingle at the edges for organic blends.
- Rinse and dry the bandanas fully before folding or tying them as picnic accents.
Fabric scrap shamrock garland with warmth

A garland stitched from fabric scraps reads like a patchwork memory line, each shamrock carrying a different textile story. The edges fray slightly and the prints range from tiny florals to bold stripes, creating a lively rhythm along the strand.
I remember making one using leftover shirt scraps and feeling pleased at the thrift and color. When draped over a mantle, the garland brings an approachable, homemade vibe and the soft fabric moves gently with the air, offering quiet color and cozy texture.
Steps
- Collect small fabric scraps in green hues, a needle and thread, and a length of ribbon or twine.
- Cut shamrock shapes from the scraps and layer a couple of pieces for texture where desired.
- Stitch the shamrocks to the ribbon at intervals so they hang flat and stable.
- Drape the finished garland where its soft movement and mixed patterns add cozy color.
Hand-decorated lucky stones for pockets

Small hand-decorated stones have a satisfying weight and a smoothness that calms the palm. I keep a few on a shelf and find myself turning them over between tasks, enjoying the tiny painted dots or a single stamped shamrock.
The painted surface sometimes develops a faint sheen and the underside keeps the memory of where it rested. Giving one away feels like passing along a little permission to pause, and the stones make quiet, tactile companions that tuck easily into a pocket or a desk drawer.
Steps
- Gather small, smooth stones, water-based paint or markers, and a sealant for durability.
- Clean and dry each stone so the surface is ready for decoration.
- Add a small motif like a shamrock or dot pattern and allow the decoration to dry fully.
- Apply a thin sealant coat if desired so the stones hold up to handling in pockets.